
Peppermint Candy Bath Bomb Project
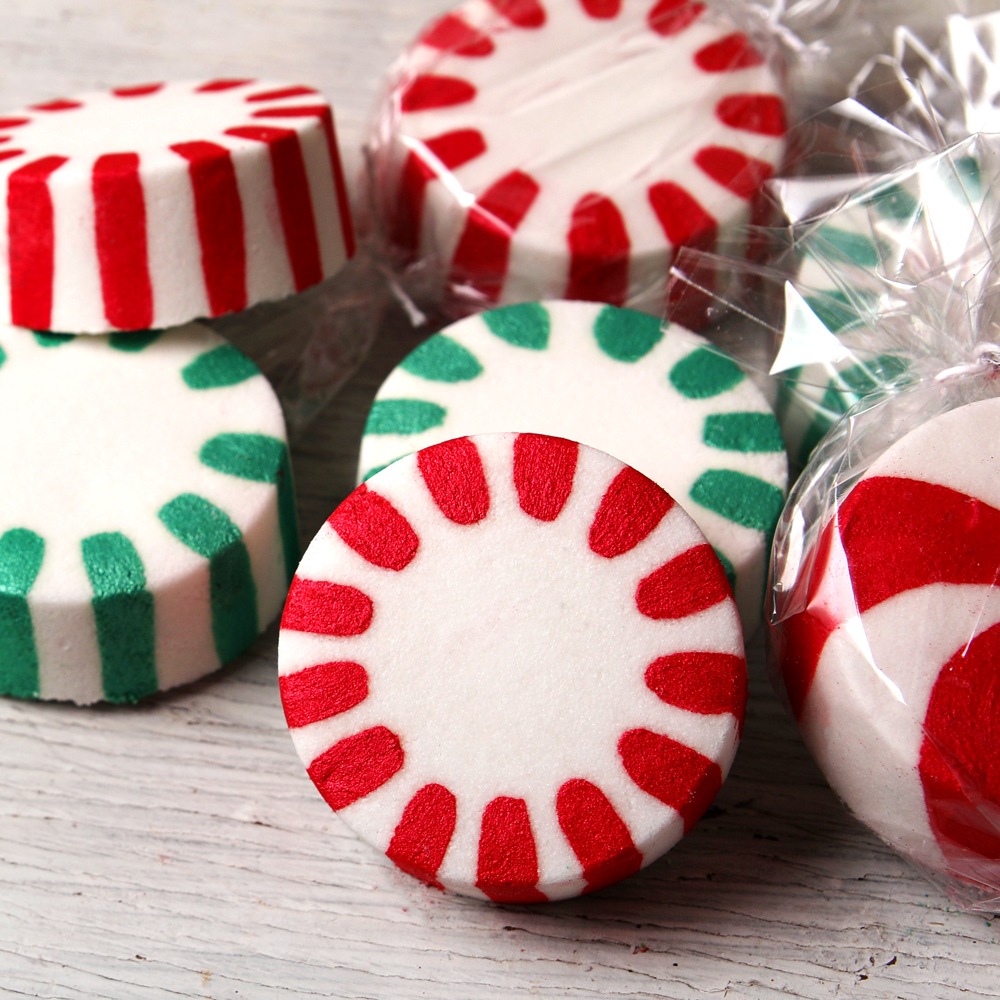
These bath bombs look and smell just like a peppermint candy!
This recipe is scented with Candy Cane Fragrance Oil, which is a classic combination of peppermint, vanilla, and sugar. Once the bath bombs are formed in the Disk Mold and Package and left to dry, they're painted with a mixture of mica and 99% isopropyl alcohol.
They make great gifts for the holidays. We love using the Disk Molds to package and gift these bath bombs. The sturdy plastic helps protect them as well, as bath bombs can be delicate. Another packaging option is placing them in plastic bags and tying them on both ends. They'll look even more like the classic treat!
Want additional DIY bath bomb supplies? Take a look at Bramble Berry's bath bomb kits.
What You Need:

Disk Mold and Package, Plastic - 10 molds

Sodium Bicarbonate - 1 lb

Citric Acid - 1 lb

Red Mica - 1 oz

99% Isopropyl Alcohol - 1 bottle (16 oz by volume)

Candy Cane Fragrance Oil - 2 oz

Polysorbate 80 - 1 oz

Witch Hazel - 1 lb

Sweet Almond Oil - 1 lb

Deodorized Cocoa Butter Wafers - 1 lb

Shamrock Green Mica - 1 oz
Recipe
INGREDIENTS:
- Sodium Bicarbonate - 1 lb
- Citric Acid - 1 lb
- Red Mica - 1 oz
- Candy Cane Fragrance Oil - 2 oz
- Polysorbate 80 - 1 oz
- Witch Hazel - 1 lb
- Sweet Almond Oil - 1 lb
- Deodorized Cocoa Butter Wafers - 1 lb
- Shamrock Green Mica - 1 oz
EQUIPMENT:
- Disk Mold and Package, Plastic - 10 molds
- 99% Isopropyl Alcohol - 1 bottle (16 oz by volume)
Instructions

You will need:
- 7-8 Disk Mold & Packages
- 16 oz. Sodium Bicarbonate (Baking Soda)
- 8 oz. Citric Acid
- 1 oz. Cocoa Butter Wafers
- 0.5 oz. Sweet Almond Oil
- 0.5 oz. Polysorbate 80
- 0.5 oz. Candy Cane Fragrance Oil
- 1 tsp. Red Mica
- 1 tsp. Shamrock Green Mica
- Witch Hazel in a Spray Bottle
- 2 Tbsp. 99% Isopropyl Alcohol
Note: This project was originally made with Kelly Green Mica
Follow these steps:
1
In a small heat-safe container, melt 1 ounce of cocoa butter and 0.5 ounces of sweet almond oil in the microwave using 30-60 second bursts. Stir in 0.5 ounces of Candy Cane Fragrance Oil and 0.5 ounces of polysorbate 80. Mix well and set aside.
2
In a large bowl, mix together 16 ounces of baking soda and 8 ounces of citric acid. To get rid of clumps, you can push the powders through a sifter or break them up with your fingers. Citric acid has a tendency to take off nail polish, so wear gloves to protect your manicure.
3
Add the oil to the powder. Use your hands to mix together.
4
Test the consistency of the bath bomb mixture. It should feel similar to wet sand and hold its shape when squeezed. If it’s too dry, use one hand to spritz the mixture with witch hazel and one to mix.
5
Fill the Disk Mold and Packages with the bath bomb mixture. Firmly compact it in to create a solid shape. Only fill each mold to the inner lip, or the lid won't close. Allow the bath bombs to dry and harden for at least 4 hours or up to overnight, and then remove them from the molds.
6
Mix 1 teaspoon of Red Mica or Kelly Green Mica with 1 tablespoon of 99% isopropyl alcohol. Use a paint brush to create lines around the outside and down the sides of each bath bomb. If you find the paint is bleeding, add more mica to thicken. If it’s too thick, add a bit more 99% isopropyl alcohol.
7
Continue this process with each bath bomb. Allow the paint to dry for 1-2 hours. The paint transfers when touched, so handle carefully. To use, place the bath bombs into a hot bath and enjoy!
Tutorial credits
Photographer: Amanda Kerzman
Peppermint Candy Bath Bomb Project
- LEVEL Beginner
- TIME 1 hour
- YIELD About 7-8 Bath Bombs
Project Description
This recipe is scented with Candy Cane Fragrance Oil, which is a classic combination of peppermint, vanilla, and sugar. Once the bath bombs are formed in the Disk Mold and Package and left to dry, they're painted with a mixture of mica and 99% isopropyl alcohol.
They make great gifts for the holidays. We love using the Disk Molds to package and gift these bath bombs. The sturdy plastic helps protect them as well, as bath bombs can be delicate. Another packaging option is placing them in plastic bags and tying them on both ends. They'll look even more like the classic treat!
Want additional DIY bath bomb supplies? Take a look at Bramble Berry's bath bomb kits.
You will need:
- 7-8 Disk Mold & Packages
- 16 oz. Sodium Bicarbonate (Baking Soda)
- 8 oz. Citric Acid
- 1 oz. Cocoa Butter Wafers
- 0.5 oz. Sweet Almond Oil
- 0.5 oz. Polysorbate 80
- 0.5 oz. Candy Cane Fragrance Oil
- 1 tsp. Red Mica
- 1 tsp. Shamrock Green Mica
- Witch Hazel in a Spray Bottle
- 2 Tbsp. 99% Isopropyl Alcohol
Note: This project was originally made with Kelly Green Mica
Follow these steps:
1
In a small heat-safe container, melt 1 ounce of cocoa butter and 0.5 ounces of sweet almond oil in the microwave using 30-60 second bursts. Stir in 0.5 ounces of Candy Cane Fragrance Oil and 0.5 ounces of polysorbate 80. Mix well and set aside.
2
In a large bowl, mix together 16 ounces of baking soda and 8 ounces of citric acid. To get rid of clumps, you can push the powders through a sifter or break them up with your fingers. Citric acid has a tendency to take off nail polish, so wear gloves to protect your manicure.
3
Add the oil to the powder. Use your hands to mix together.
4
Test the consistency of the bath bomb mixture. It should feel similar to wet sand and hold its shape when squeezed. If it’s too dry, use one hand to spritz the mixture with witch hazel and one to mix.
5
Fill the Disk Mold and Packages with the bath bomb mixture. Firmly compact it in to create a solid shape. Only fill each mold to the inner lip, or the lid won't close. Allow the bath bombs to dry and harden for at least 4 hours or up to overnight, and then remove them from the molds.
6
Mix 1 teaspoon of Red Mica or Kelly Green Mica with 1 tablespoon of 99% isopropyl alcohol. Use a paint brush to create lines around the outside and down the sides of each bath bomb. If you find the paint is bleeding, add more mica to thicken. If it’s too thick, add a bit more 99% isopropyl alcohol.
7
Continue this process with each bath bomb. Allow the paint to dry for 1-2 hours. The paint transfers when touched, so handle carefully. To use, place the bath bombs into a hot bath and enjoy!
Tutorial credits
Photographer: Amanda Kerzman