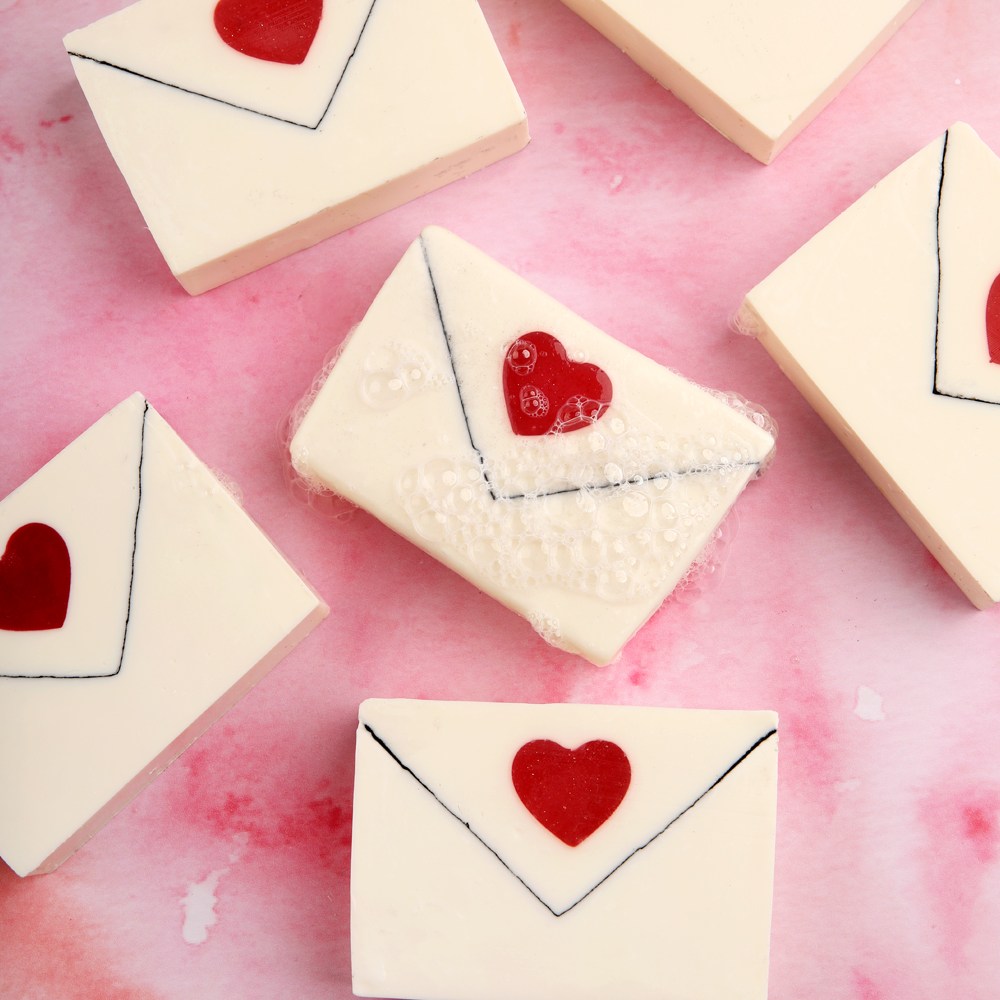

Love Letter Soap Project
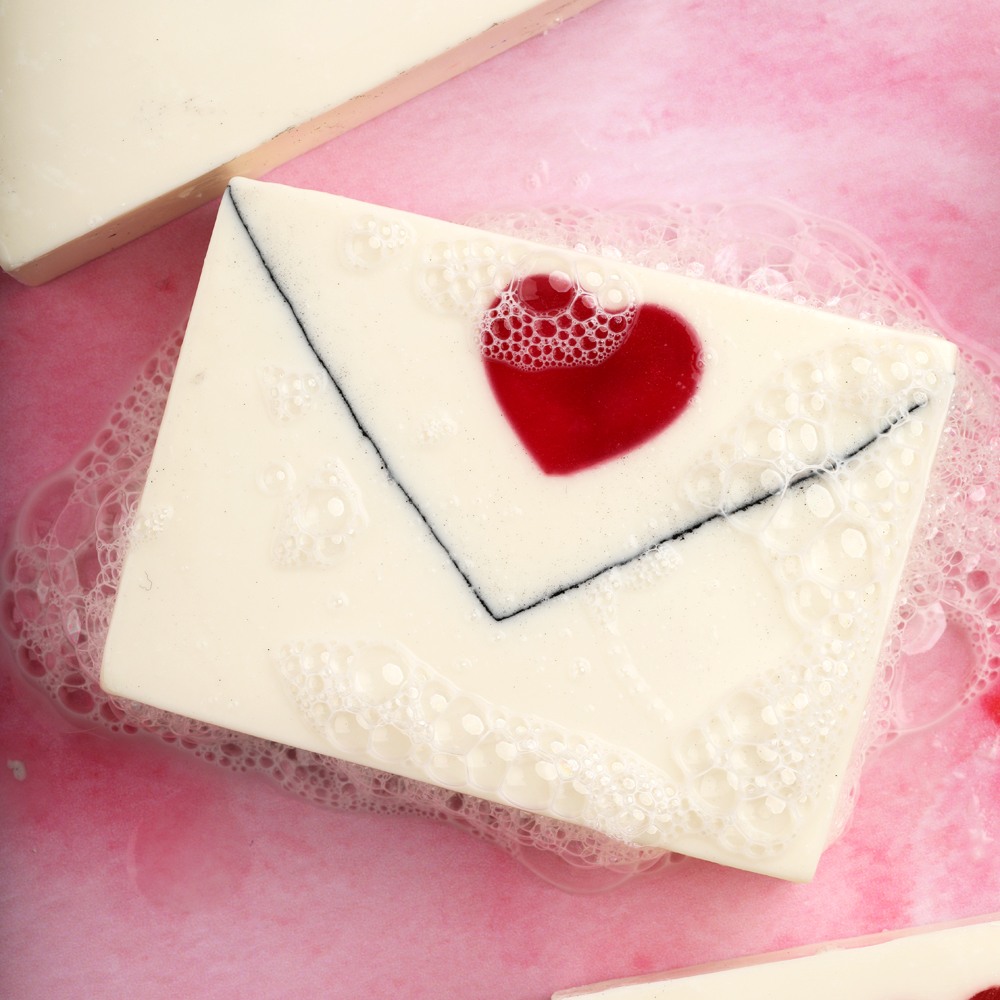
Getting a letter in the mail is an amazing feeling. Getting a handmade bar of soap in the mail is an amazing feeling. This project is the best of both worlds! It’s created using the negative space technique. After the soap is poured, some is scraped out to form a triangle. Then, add a charcoal line and a cute heart embed. Once the bars are cured, you can mail them to your loved ones!
This soap is an advanced project and requires a good understanding of trace. It has a 10% water discount to set up quicker, and to prevent glycerin rivers due to the large amount of titanium dioxide. Learn more about water discounting here.
While you're scraping out soap to create the triangle shape, some can get lost. Having a few extra ounces ensures there's enough to cover the embed. You can put any leftover soap in another mold.
When dusting the layer of activated charcoal, be careful to not use too much. A layer that is too thick can cause the soap to separate. We also recommend using LCP melt and pour base for the embed to prevent glycerin dew.
What You Need:

10 inch Silicone Loaf Mold

Lots of Lather Quick Mix - 54 oz

Mini Heart Silicone Column Mold

SFIC LCP Clear Melt And Pour Soap Base - 1 lb

Love Letter Fragrance Oil - 1.75 oz

Fine Red EcoGlitter - 1 oz

Magenta Color Block - 1 Block

Titanium Dioxide Pigment - 1 oz

Activated Charcoal - 1 oz

Sodium Hydroxide Lye

Sodium Lactate - 4 oz
Recipe
INGREDIENTS:
- Lots of Lather Quick Mix - 54 oz
- SFIC LCP Clear Melt And Pour Soap Base - 1 lb
- Love Letter Fragrance Oil - 1.75 oz
- Fine Red EcoGlitter - 1 oz
- Magenta Color Block - 1 Block
- Titanium Dioxide Pigment - 1 oz
- Activated Charcoal - 1 oz
- Sodium Hydroxide Lye
- Sodium Lactate - 4 oz
EQUIPMENT:
- 10 inch Silicone Loaf Mold
- Mini Heart Silicone Column Mold
Instructions

You will need:
- Heart Embed
- Mini Heart Column Mold
- 4 oz. LCP Clear Soap Base
- Magenta Color Block
- 1/4 tsp. Fine Red EcoGlitter
- Soap Base
- 10" Silicone Loaf Mold
- 35 oz. Lots of Lather Quick Mix
- 5 oz. Sodium Hydroxide
- 10 oz. Distilled Water (10% water discount)
- 1.75 oz. Love Letter Fragrance Oil
- 1 Tbsp. Titanium Dioxide
- Activated Charcoal
Follow these steps:
MAKE THE EMBEDS
1
Cut 4 ounces of LCP Clear Soap Base into small, uniform pieces and place them in a heat-safe container. Add a small chunk of Magenta Color Block and heat in the microwave using 15 second bursts.
2
Add 1/4 teaspoon of Fine Red EcoGlitter to the melted soap and stir.
3
If necessary, allow the soap to cool to about 125-130° F so the glitter disperses evenly. Pour the soap into the Mini Heart Silicone Column Mold. Place the mold in a secure upright position and allow to cool for about 2 hours.
4
Unmold and trim the embed if necessary. Then, cut it to fit inside the 10" Silicone Loaf Mold and set aside.
MAKE THE BASE
FRAGRANCE PREP: Measure 1.75 ounces of Love Letter Fragrance Oil into a small glass container and set aside.
COLORANT PREP: Have activated charcoal and a fine mesh strainer nearby to dust between layers.
SAFETY FIRST: Suit up for safe handling practices. That means goggles, gloves, and long sleeves. Make sure kids, pets, other distractions, and tripping hazards are out of the house or don’t have access to your space. Always make soap in a well-ventilated area.
SCULPTING TOOL PREP: Cut a piece of cardboard into a square that is the same width as the outside of the 10" Silicone Loaf Mold (about 5.2 inches), and a similar depth. Decide on the angle and depth of your triangle - we designed ours so that two sides of the triangle begin at the top of the mold. Then, draw lines and cut it out, leaving space at the top to cut out two "arms." These will rest on top of the mold to keep the tool level throughout the process. Once you’re happy with the size and shape, wrap it in clear packaging tape. This makes it stronger and longer lasting.
1
Slowly and carefully add 5 ounces of lye to 10 ounces of distilled water and gently stir until the lye has fully dissolved and the liquid is clear. Optional: Add 2 teaspoons of sodium lactate to help the bars harden more quickly.
2
Melt the bag of Lots of Lather Quick Mix in the microwave using 60 second bursts until it's no longer cloudy. Pour 35 ounces into a large heat-safe mixing bowl. Then, add 1 tablespoon of titanium dioxide directly to the oils and stick blend until smooth.
3
Once the lye water has cooled to about 110° F, slowly add it to the oils and use the stick blender to mix until they have reached a thin trace.
4
Whisk in the 1.75 ounces of Love Letter Fragrance Oil. If the soap is still at a thin trace, stick blend until it reaches a light-medium trace. Pour the batter into the mold until full - you may have a little soap left in your bowl.
5
Wait for the soap to firm and harden. It should be firm enough to hold its shape but thin enough to be scraped out easily. It’s a little hard to know when you have that perfect texture - we tested every minute or so by scraping a small amount off the very top.
It’s better to start scraping out the extra soap sooner rather than later. If it gets too thick, there is no going back.
6
Insert the cardboard cutout and begin pulling it through the mold. Place the extra soap into a separate mold to save it. The first few passes with the cardboard will be a little awkward and messy, but that’s okay!
As you move the cardboard piece down the mold, lift it up and out to discard the excess soap. Move it in both directors to get a smooth shape. If necessary, place soap that has been removed back into the mold to fill in any gaps.
7
Using a fine mesh strainer, dust a layer of activated charcoal into the negative space. Don't add too much or the soap can separate.
8
Gently spoon the soap back into the mold on top of the charcoal layer. Be careful to not disrupt the layer below. Spoon it into the point of the triangle first and very gently tap the mold on the counter to help it settle.
9
Continue until it's about halfway full, then insert the heart embed and press it in gently. Cover the heart embed with more soap and continue until the mold is full. Tap lightly on the counter to help the soap settle.
10
Allow the soap to harden in the mold for 2-3 days. Gently release it from the mold and cut into bars. Depending on your preference, use a knife or soap shaver to create a smooth and straight top. Allow to cure for 4-6 weeks and enjoy!
Tutorial credits
Photographer: Amanda Kerzman
Love Letter Soap Project
- LEVEL Advanced
- TIME 2 hours
- YIELD About 3 pounds of soap
Project Description
Getting a letter in the mail is an amazing feeling. Getting a handmade bar of soap in the mail is an amazing feeling. This project is the best of both worlds! It’s created using the negative space technique. After the soap is poured, some is scraped out to form a triangle. Then, add a charcoal line and a cute heart embed. Once the bars are cured, you can mail them to your loved ones!
This soap is an advanced project and requires a good understanding of trace. It has a 10% water discount to set up quicker, and to prevent glycerin rivers due to the large amount of titanium dioxide. Learn more about water discounting here.
While you're scraping out soap to create the triangle shape, some can get lost. Having a few extra ounces ensures there's enough to cover the embed. You can put any leftover soap in another mold.
When dusting the layer of activated charcoal, be careful to not use too much. A layer that is too thick can cause the soap to separate. We also recommend using LCP melt and pour base for the embed to prevent glycerin dew.
You will need:
- Heart Embed
- Mini Heart Column Mold
- 4 oz. LCP Clear Soap Base
- Magenta Color Block
- 1/4 tsp. Fine Red EcoGlitter
- Soap Base
- 10" Silicone Loaf Mold
- 35 oz. Lots of Lather Quick Mix
- 5 oz. Sodium Hydroxide
- 10 oz. Distilled Water (10% water discount)
- 1.75 oz. Love Letter Fragrance Oil
- 1 Tbsp. Titanium Dioxide
- Activated Charcoal
Follow these steps:
MAKE THE EMBEDS
1
Cut 4 ounces of LCP Clear Soap Base into small, uniform pieces and place them in a heat-safe container. Add a small chunk of Magenta Color Block and heat in the microwave using 15 second bursts.
2
Add 1/4 teaspoon of Fine Red EcoGlitter to the melted soap and stir.
3
If necessary, allow the soap to cool to about 125-130° F so the glitter disperses evenly. Pour the soap into the Mini Heart Silicone Column Mold. Place the mold in a secure upright position and allow to cool for about 2 hours.
4
Unmold and trim the embed if necessary. Then, cut it to fit inside the 10" Silicone Loaf Mold and set aside.
MAKE THE BASE
FRAGRANCE PREP: Measure 1.75 ounces of Love Letter Fragrance Oil into a small glass container and set aside.
COLORANT PREP: Have activated charcoal and a fine mesh strainer nearby to dust between layers.
SAFETY FIRST: Suit up for safe handling practices. That means goggles, gloves, and long sleeves. Make sure kids, pets, other distractions, and tripping hazards are out of the house or don’t have access to your space. Always make soap in a well-ventilated area.
SCULPTING TOOL PREP: Cut a piece of cardboard into a square that is the same width as the outside of the 10" Silicone Loaf Mold (about 5.2 inches), and a similar depth. Decide on the angle and depth of your triangle - we designed ours so that two sides of the triangle begin at the top of the mold. Then, draw lines and cut it out, leaving space at the top to cut out two "arms." These will rest on top of the mold to keep the tool level throughout the process. Once you’re happy with the size and shape, wrap it in clear packaging tape. This makes it stronger and longer lasting.
1
Slowly and carefully add 5 ounces of lye to 10 ounces of distilled water and gently stir until the lye has fully dissolved and the liquid is clear. Optional: Add 2 teaspoons of sodium lactate to help the bars harden more quickly.
2
Melt the bag of Lots of Lather Quick Mix in the microwave using 60 second bursts until it's no longer cloudy. Pour 35 ounces into a large heat-safe mixing bowl. Then, add 1 tablespoon of titanium dioxide directly to the oils and stick blend until smooth.
3
Once the lye water has cooled to about 110° F, slowly add it to the oils and use the stick blender to mix until they have reached a thin trace.
4
Whisk in the 1.75 ounces of Love Letter Fragrance Oil. If the soap is still at a thin trace, stick blend until it reaches a light-medium trace. Pour the batter into the mold until full - you may have a little soap left in your bowl.
5
Wait for the soap to firm and harden. It should be firm enough to hold its shape but thin enough to be scraped out easily. It’s a little hard to know when you have that perfect texture - we tested every minute or so by scraping a small amount off the very top.
It’s better to start scraping out the extra soap sooner rather than later. If it gets too thick, there is no going back.
6
Insert the cardboard cutout and begin pulling it through the mold. Place the extra soap into a separate mold to save it. The first few passes with the cardboard will be a little awkward and messy, but that’s okay!
As you move the cardboard piece down the mold, lift it up and out to discard the excess soap. Move it in both directors to get a smooth shape. If necessary, place soap that has been removed back into the mold to fill in any gaps.
7
Using a fine mesh strainer, dust a layer of activated charcoal into the negative space. Don't add too much or the soap can separate.
8
Gently spoon the soap back into the mold on top of the charcoal layer. Be careful to not disrupt the layer below. Spoon it into the point of the triangle first and very gently tap the mold on the counter to help it settle.
9
Continue until it's about halfway full, then insert the heart embed and press it in gently. Cover the heart embed with more soap and continue until the mold is full. Tap lightly on the counter to help the soap settle.
10
Allow the soap to harden in the mold for 2-3 days. Gently release it from the mold and cut into bars. Depending on your preference, use a knife or soap shaver to create a smooth and straight top. Allow to cure for 4-6 weeks and enjoy!
Tutorial credits
Photographer: Amanda Kerzman